
In our today's sewing lesson we will teach you that how to draft collar, cut collar on fusing and how to stitch collar for your shirt, kurti, blouse or coat. In this collar designing class we also tell you different parts name of designer collar neck.
But before going to our tutorial we want to tell you few tips.
Tip-1: First draw collar draft on paper again and again, and make sure now you are ready to draw draft on fusing.
Tip-2: After cutting draft on fusing canvas cut the same shape piece on fabric with half inch extra to leave seam allowance from all edges.
Tips-3: Don't mark with pen and use tailor chalk for marking.
Tip-4: For creating neck with collar on any dress you have to attach both parts shoulder like back with fronts by laying right side of back part and then laying right side fabric on it.

Let's start our sewing and cutting tutorial-9 in which you will learn how to cut and stitch collar neck designs.
Collar before drafting:
Keep in mind before drafting the collar that you have to leave extra fabric for button holes / button line or button stand and then mark after the best practice on paper.
Keep in mind before drafting the collar that you have to leave extra fabric for button holes / button line or button stand and then mark after the best practice on paper.
After drafting leave the half inch fabric on all outside edges for neat sewing. Because here mentioned all 13 collar neck styles are difficult and you can made after drills so do not try any design directly on fabric.
After practice you are ready to cut collar on fusing in your own measurement and stitch on shirt as per our guidelines.

 Different parts names of collar / coat collar / shirt collar
Roll line: The part where collar curve from front side call roll line as mentioned with image.
Neck Line: The line where collar curve touches with neck call necklines see below.
Break Line: the line where collar starts folding from front call break line.
Break point: on front part where collar turn outside call break point.

 Center line: it is the point on back and front which gives the idea about center of shirt call center line.
Button stand: It also call placket, it is the part of neck which we use to join button to close with other strip where button holes are situated.
Stand: the part which give the strength to collar neck call stand.
Fall: The part on which collar starts bending call fall.
Style line: It is the part of collar which highlight the collar design by turning out or moving to front part.
For more instance please look below at all Top 13 Collar neckline Drafting and Cutting guide
For more instance please look below at all Top 13 Collar neckline Drafting and Cutting guide
Baby Collar neck Drafting and Cutting


How to Cut Collar and create collar neckline?


traditional collar designs for coats, kameez and front open shirts


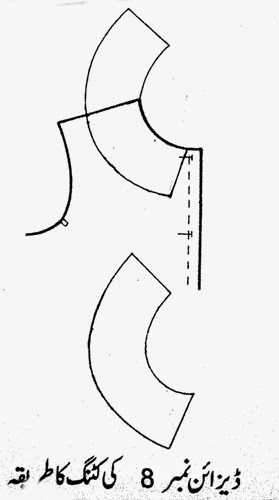
Collar Neck Design No-4


Learn stitching of collar neck with new designs


Collar necklines collection 2014-2015


Double Collar style


Baby Collar Design for frocks

Collar neck for shirts


Collar neck for front open shirt


Coat Collar Design


Gents Collar for Shirts, Dress shirts and Kameez


Sherwani Collar or mandarin collar

Note: All right reserved: copying strongly prohibited of images and article.
Comments
Post a Comment
Hey Guys - We would love to here from you!!! Leave your comments below & share your thoughts + inspirations on current fashion, designs & trends or just say HELLO... :)
You can also reach us by clicking the Inquiries button below your screen.